
BoF16 Saluting a General
Series Replay: Andy Bagley (Russian) vs Jim Bishop (German)
This is the third part of a four-part scenario replay between the above gentlemen. Played live over the course of three sessions on the VASL server in January of this year, the scenario is six-and-a-half turns long. Pregame commentary can be found here. Part 2 reviews Turns 1 through 3 of this MMP-version of an original scenario published by Friendly Fire. What follows is Turns 4 and 5. Andy and Jim provide some commentary, but the text is largely based on notes I recorded when I ran the VASL log for the first time. Get comfortable in your armchair as I pontficate from the comfort of mine.
 |
| BoF16 GT4 End of CCPh |
German Turn 4

In Andy’s half, he manages to Shock one of my Pz IIIGs with his mortar. I knew it was somewhere there but I couldn’t let the unknown hold me back. Now I am really behind in the armor game.


 |
| BoF16 GT4 RPh Board 42 |
On cue, the Pz IIIJ in 42X4 fires and hits the heretofore charmed Stuart to its south. Incredibly, the Russian crew survives the destruction of its vehicle. Charmed after all. The plucky crew gave as good as it got, and bought the Defender more time. Tick-tock. Jim’s MA shot at the crew was an unnecessary risk. With only two functioning long-barrels, the Pz IIIJ need to hold their MA fire for armoured targets. I sense frustration. The tank with the malfunctioned MA could have attacked the crew later in the turn with a 12+1 BFF shot if the crew was that much of a threat, which in my view it isn’t.
 |
| BoF16 GT4 PFPh Board 42 |
The Germans are surprisingly cautious with their armour this turn. [Jim: Perhaps too cautious. If I didn’t have to Prep to kill the tank in 42X4 I would have been a little more aggressive. I didn’t have the advantage in tanks and I was certainly behind in terms of Gun tubes.] The Pz IIIJ in Bypass of 42V1 has more important work to do than “freeze” the 8-1/HMG stack. The other tank with an armour leader could have accomplished this after its BFF shot, releasing the most potent panzer for other duties.
The Russian mortar finally comes out to play. It has a one-in-four probability of damaging the enemy tank in its sights, because all of the vehicle’s AF are less than or equal to 4 (C1.55). My money is on the high Rate-of-Fire (ROF) weapon in this duel.
 |
| BoF16 GT4 DFPh Board 85 |
The Stuart on board 5 gets lucky and dispatches a German HS in 5S4. Not a significant event by any means. It is, however, another irritating distraction that Jim is best not to dwell on. The Germans need to stay focussed. On the plus side, the Germans manage to tidy up the battlefield by eliminating a couple of Russian squads in the RtPh.
At this point, I think it’s becoming obvious to Jim that the remaining Lees are going to be tough nuts to crack with his armour. [Jim: Remember when I said on Turn 1, I figured out which tanks were which by asking the number of MP’s spent to get there? I knew then they would be a tough nut to crack. Having said that, I also should have known then that a second tank on board 85 would have been better.] In light of this, I’m surprised that he chose to shift the majority of his Elite squads south. I would have liked to see all them head for 85M5 from where they can gain concealment and then threaten the Lees. A 9-1/4-6-8 combo would be a potent CC threat. Jim has moved the DC-toting squad within striking distance should an opportunity arise. However, the ATR would be a better bet for a DI shot from L7. I’m interested to learn what Jim is planning with the ATR. Ditto for the MMG stack. I briefly thought that he might take advantage of the steeple Location to take the mortar under fire. (The leadership DRM would offset the overstacking penalty.) I think the 9-1 wasted a turn maneuvering for no gain.
The Russian 8-1 dodges CC. Although his life expectancy remains short, it’s another of those death-by-a-thousand-paper-cut moments that can weaken a player’s resolve.
 |
| BoF16 RT4 End of CCPh |
Russian Turn 4

 |
| BoF16 RT4 PFPh Board 85 |
The mortar comes through on its first salvo, and Shocks the German tank. Andy made a good play when he assembled the mortar and fired on the Pz IIIG. Until then it wasn’t clear where the mortar was, although it was likely to be in the southern tree line. The special capability of this mortar was used to good effect by remaining concealed until the trap was sprung. Full credit to Andy on this. With freedom to adopt whatever CA it wanted upon assembly, a “free shot,” and the prospect of (high) ROF in the following PFPh, the mortar put the tank in a bind. Each hit had a 27% chance of affecting the tank. (Andy: The target is now double-acquired, so taking account of TH# and multiple ROF, I calculated about 30% overall chance from future shots of another Shock or better.)
 |
| BoF16 RT4 DFPh |
One Lee shifts to cover the 85F1 gap. So far, so good. And in what is becoming a worrisome pattern, the Stuart on board 5 ends its turn where it cannot effect German movement the following turn. Argh! Meanwhile the sideshow that was 42J3 sees the broken German HS exit stage left after the Russian Sniper takes aim. On the bright side, the hapless HS spared a more important unit the indignity of breaking, or worse, dying. The turn ends with the Russians no worse off than when it started, and a Pz IIIG in a bad way.
 |
| BoF16 GT5 End CCPh |
German Turn 5


 |
| BoF16 GT5 MPh |
In the south, the red-capped panzer pastes the enemy squad in 42U5. The surviving Conscripts are unlikely to pose a threat for the remainder of the game. It’s a good use of a handicapped tank. Questionable, however, is Jim’s eagerness to dispatch the Russian crew in 42Y6. Even if the crew is eliminated in CC, the German squad will play no role in the final battle for the VC area. I get that the crew could pose a problem for German routs at some point. But I don’t think it would be a game changer. From my armchair, the Germans need more not less squads for the final rush on the VC area.
 |
| BoF16 GT5 MPh |
However, the destruction of the Pz IIIJ in 42T1 sounds the death knell of any hope the Germans had of winning this contest. [Overlooked was the German Sniper Activation. A 1 result followed by a direction 2 and distance 6 would have Recalled the Stuart in 5L2.] Even if the panzer had been hit on the front aspect of the turret, the Russian round would have penetrated the armour. The German crew survives, and the Stuart pivots to face the concealed HS that threatens to advance into 85K4. The prospect of a six-flat MG shot may be enough to cancel any such plan. (It doesn’t.) German Infantry presses forward in the APh, only to see the Russian crew evade CC and slip into 42Z5. Not wishing to tempt the enemy Sniper, the panzers close their hatches. A wise move given that Russian tanks would be foolish to move into LOS. The Germans need to come to them. Not the other way around.
 |
| BoF16 GT5 CCPh |
Second Intermission

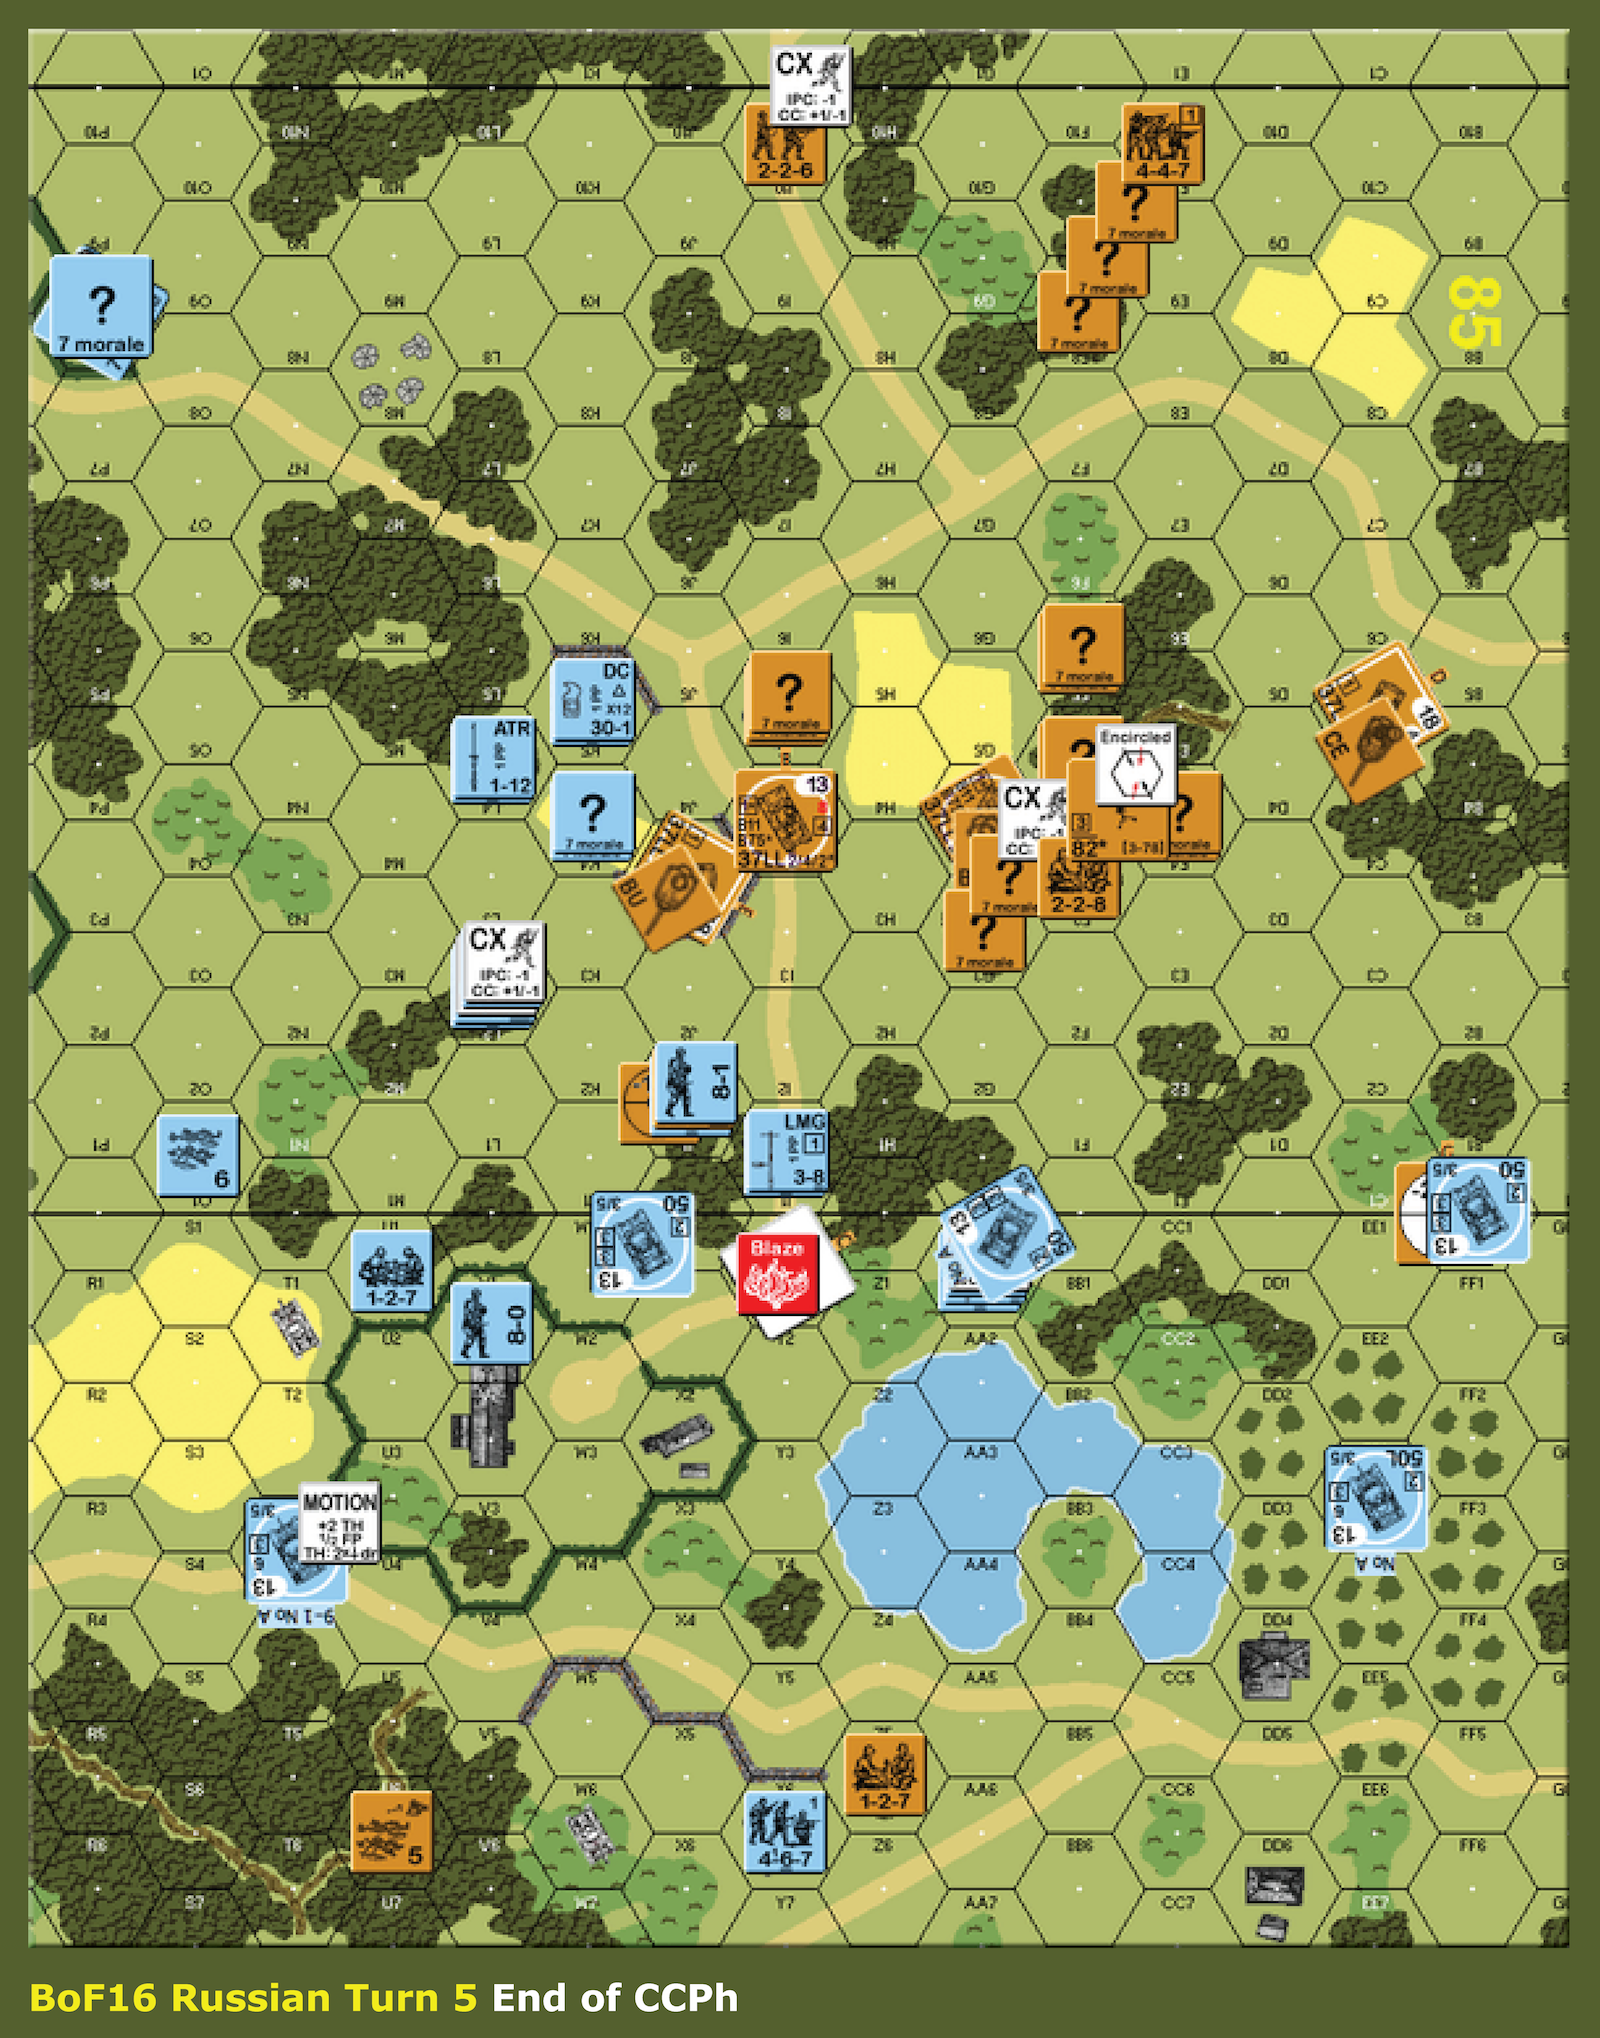 |
| BoF16 RT5 End CCPh |
Russian Turn 5

 |
| BoF16 RT5 RPh |
The RPh sees a revival of German fortunes. Jim’s tankers repair an MA in 42T3 and recover from UK status in 42FF0. Not to be outdone, a Russian Conscript HS self rallies in 5M10, although at this point, it’s little more than mobile Sniper bait.
Russian tank fire in the PFPh not only fails to break any German units, but also fails to target the German squad in 85L4. As the most immediate threat to the Lees, the German ATR ought to have drawn some fire. Even the concealed HS adjacent to the Stuart in 85J3 is ignored. At the same time, the mortar fails to have an impact on its target. Andy nevertheless continues to fallback to the VC area in good order. I expect at least one if not both squads on board 5 to reach 85E6 by the end of Turn 6. The northernmost Stuart briefly exposes itself to fire in order to take up a position in 85C5. But the gamble pays off. The Germans will not be able to turn this flank without risking a panzer.
 |
| BoF16 RT5 MPh |
In the DFPh, Jim’s ATR misses the mark, and the Lee in 85I4 is spared the indignity of an Immobilization TC. The Germans do encircle the enemy mortar crew, but fail to capitalize on its lowered Morale. [The Russians are in good shape. With two turns to go, the Germans are within striking distance. Just.]
Part 4 is here!
No comments:
Post a Comment