03 December 2021

BattleDice - A Decade On

BattleDice - A Decade On

It’s been four years since we last released new BattleDice. A lot has happened in the interim. Rather than dwell on the past, I thought I’d look ahead to 2022. Over the years, we’ve received requests to produce a host of new designs, not all of them for ASL. But this post is about ASL. Specifically, it’s about the prospect of new 16mm designs.

As we’ve explained in our KitShop catalogue, and on the 12.5mm page, we have no plans to produce additional designs in 12.5mm, largely due to the higher production costs for this size (and 14mm). This is not to say that we would never design any new BattleDice in these smaller formats, only that a design would have to warrant the higher outlay. Those lobbying for a set of 12.5mm die for the Korean War are therefore out of luck. Cost, however, is not the only factor. A recurring theme throughout this post is that some designs are simply impractical in light of the tiny amount of real estate to work with on the face of a die and the complexity of some designs. I can, and do, take liberties when creating artwork for a die. But there are limits.

Past as prologue 

From our standpoint, a new design succeeds if a 100 units are sold. This is a break-even equation based on initial start up and production costs. Time spent in the design, packaging, and marketing of new BattleDice is rarely recouped. And although 100 is not a big number, some designs released more than five years ago have yet to reach this target. 

For example, in 2016, we released D-Day sets for the US landing beaches code-named Omaha and Utah. These BattleDice were in anticipation of Multi-Man Publishing (MMP) releasing a historical module (HASL) centred on actions immediately beyond the beachhead. The set containing the “Big Red One” and the 29th US Infantry Divisions have sold quite well. Not so the rest. It’s a shame, as even without the Normandy HASL, there are heaps of scenarios where these BattleDice will be at home. A scenario published in ASL Starter Kit Bonus Pack 2 earlier this year illustrates the point. “Going Commando” features elements of Infanterie-Division 709 and the US 9th Infantry Division. Then again, one could simply use our US Army pair together with a German pair of your choosing.

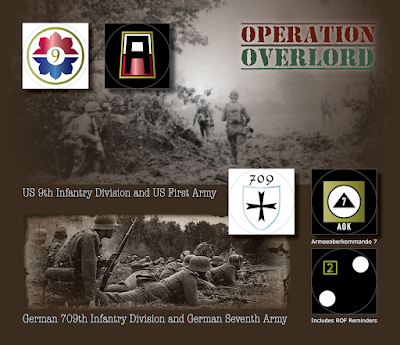
16mm Operation Overlord (D-Day) Series

Additions to our Europa Series of 16mm BattleDice are the most recent examples of this trend. The Belgian pair is a personal fave. But it, like the Romanian pair, has not reached that important benchmark. In fairness, the Romanian pair has done a little better of late. And in time, we expect to sell out of all of these newer designs. In the meantime, however, this “excess” inventory ties up capital for future projects.

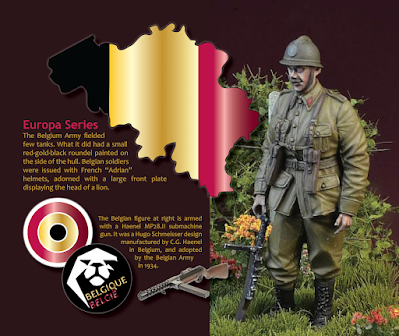
16mm Europa Series - Belgian Pair

Could less be more?

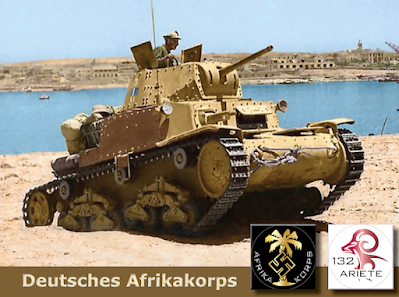
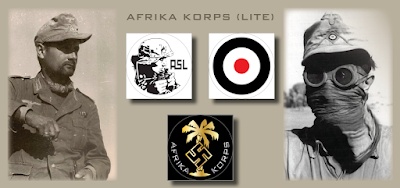
So where does that leave us? Well, with the release of a new and expanded Hollow Legions, especially the updated rules for North Africa, there is a purported demand for something with a desert theme. And what could be more Sahara-like than a palm tree and a jerboa, or desert rat?

I’m not convinced of the demand for such BattleDice, as attractive as they might be. But I’ve had at least six people urging me to take on the project. Not one for half measures, I came up with eight prospective designs. With the exception of the Italian and Afrika Korps set, these beauties could be used in Europe, primarily on the Italian mainland. The designs below aren’t final, but should provide you with an idea for what’s possible. Of course, we could simply release one die, the black Afrika Korps die with the gold palm on display at the beginning of this post, and call it done. What do you think?

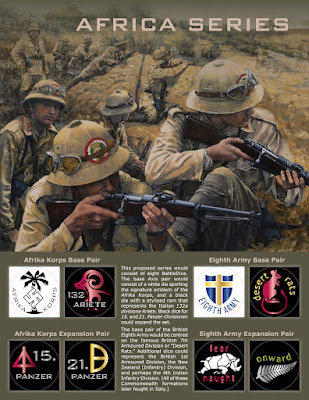
16mm Africa Series (tentative)

Some have been clamouring for a Fallschirmjäger (FJ) die too. It’s a tricky subject given the amount of detail and overlapping elements. A die for the Großdeutschland Division would be an easier ask, but I’ve received less interest in it. An FJ die, moreover, has an added advantage in that it could be used to represent any number of Luftwaffe parachute divisions. If we only produced a single DAK die, why not a single FJ die too? Both could be paired with one of the dice from our ASL 30th Anniversary German pair, or with the German white die from our Operation Market-Garden Series. Yes? No? 

16mm Afrika Korps Die (optional)

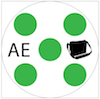
Dave Johannsen has suggested we take things one step farther. In May 2018 he made his case for a “generic” set of 16mm ASL dice. Despite owning a fistful of BattleDice, he noted that there always will be situations where he won’t have dice that match the side he’s playing. Think Ethiopian, Estonian, or for fans of something a little different, the Russian Civil War, or the 1948 Arab-Israeli War. Dave made a couple of specific suggestions including an iconic silhouette of a Landser tossing a potato masher for the colored die and an “ASL” logo for the white die. This would be his go-to pair for playing Anarchists in the Spanish Civil War, or the Indian National Army in Burma. He argued that the set would be an ideal “gateway pair of dice,” an introduction to our BattleDice.

It’s an interesting idea, although I think the ASL Anniversary sets do a good job of filling this role already. Indeed sales of the German pair suggest that it is the default pair for many players. Or is Dave on to something?

Specialized BattleDice

In June 2014, I solicited ideas for future BattleDice. I received much thoughtful feedback, and acted on a great deal of it. For instance, Dave Marteinson asked if we could produce 16mm versions of our Sniper-Effects and Heretical Rate-of-Fire specialty dice. Given that I preferred the ROF die to be either bigger or smaller than the other dice it’s rolled with, I didn’t dwell on this suggestion. I did, however, like the idea of a bigger Sniper die. And when Mike Peebles inquired about a wound die, I decided to incorporate both ideas into one, dual-purpose specialty die.

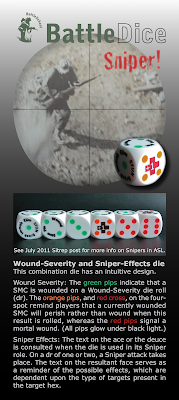
16mm Sniper-Effects and Wound-Severity Die

Other suggestions included a proposal by Brian Martuzas for a set of Offboard Artillery (OBA) dice: an accuracy die, a second “scatter direction” die, and a third extent-of-error die. He foresaw the accuracy die featuring appropriate national logos for those whose OBA is also accurate on a two. (That would be American, Commonwealth, Free French, and German, in case you were wondering.) I didn’t see the need for a separate direction-of-error die per se, reasoning that the accuracy die could fulfil this function too. The deal breaker was the extent-of-error die. An ordinary, unadorned backgammon die would suffice for this task when initially placing an Artillery Request (AR). But how could a die account for the fact that, when Correcting a SR, the Extent of Error is limited to a maximum of one hex for each multiple of three hexes, with any fractions rounded up (FRU)? If you know, let me know. 

Jackson Kwan was the most prolific in offering up ideas for specialized BattleDice. His pair of dice for determining whether a unit Strayed at night (E1.53), or in an Interior dense-jungle or bamboo hex during the day (G2.22; 3.21), was a relatively straightforward concept that was unfortunately expensive to produce as suggested. The six-spot of the color die would sport a “straying” figure. Not sure what that looks like. Regardless, if this face was rolled when making a Movement Dice Roll (DR), a Lax unit would automatically Stray.1 Jack’s plan for the white die involved different coloured pips that would indicate when a Normal or Stealthy unit Strayed. There would be black pips on the one- and two-spots, silver pips on the three- and four-spots, and gold pips on the five- and six-spots. A Normal unit would Stray when a “strayer” was rolled on the color die and the pips of the white die were metallic. Similarly, a Stealthy unit would Stray when a “strayer” was rolled with the color die and the pips of the white die were gold. The concept is not without merit. And it is possible by substituting colour pips for metallic-foil ones. But give many players fear of the dark, I don’t think the demand is there. 

Perhaps the most original of Jack’s ideas was for a set of two concealment-gain dice, one for a squad and another for a Half-Squad (HS). Playing ASL in a bubble in the late 80s and early 90s, my sole opponent and I never thought to roll for concealment gain. So in one respect, concealment-gain dice could be a boon to new players, if only to prompt them to undertake this important step at the end of the Close Combat Phase (CCPh). What made Jack’s proposal intriguing though was the use of different pip colours to factor in the ability of Stealthy Infantry, and Japanese Infantry in particular, to gain concealment more readily. For example, a regular British squad gains concealment on a die roll (dr) of 2 or less, while a Gurkha squad would do so on a dr of 3 or less, because Gurkhas receive a -1 die roll modifier (drm) for being Stealthy. However, all Japanese Infantry are entitled to a -2 drm to their Concealment dr (G1.63). Moreover, this drm is in addition to any drm for being Stealthy (or Lax).

Although it sounds cool on paper, the trouble with a concealment-gain die as proposed is that ignores other drm that may be applicable. A place could be found on a die for a reminder that a Lax unit suffers a +1 drm. More difficult would be reminder regarding Leadership. However, the Y-variable on the A12.122 Concealment drm Table is arguably the biggest challenge to incorporate on the die. I don’t see an easy solution other than to ignore this drm and trust players to factor it in on those rare occasions that it matters.

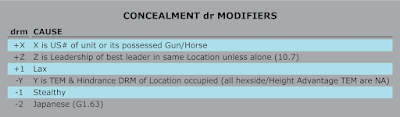
A12.122 Concealment Gain Table

I haven’t shut the door on the idea. But I’d need convincing before I’d devote more time to developing the concept.

That said, Jack’s use of red pips for Japanese Infantry did prompt me to reflect on just how apropos a red “meatball” is on a die dedicated to the Emperor’s finest. Although it took time to germinate, the seed that Jack planted grew not into a bean stalk but into a very specialized die. 

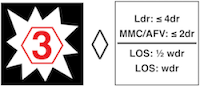
From the moment they first appeared in Code of Bushido in 1991, the Japanese have occupied a unique place in ASL. Among their numerous special capabilities is their ability to generate “suicide” heroes (G1.42). The raison d’être of one type is in the name: Tank-Hunter (T-H) Hero. Admittedly, this hero has a little more latitude and may attack any Armored Fighting Vehicle (AFV), not just tanks. On his way to meet his maker, a T-H Hero may Check for Anti-Tank Magnetic Mines (ATMM), or occasionally grab a Demolition Charge (DC) before making his suicidal charge. A DC Hero has even more freedom when it comes to what he may attack. Both may be rolled for using the ATMM and T-H/DC Hero die that I came up with below.

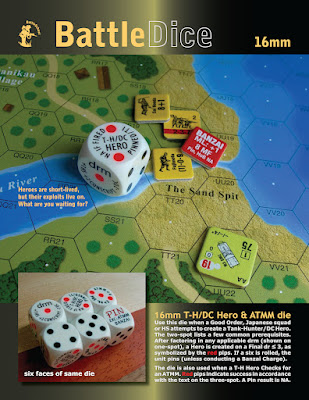
16mm ATMM and T-H/DC Hero Die

When we released the Japanese ATMM and T-H/DC Hero die in 2017, MMP had yet to publish Forgotten War, a module dedicated to the Korean War. Once I had a chance to peruse Chapter W, I was pleased to find that rules for creating South Korean Human Bullet (H-B) Heroes (W3.23) and North Korean Suicide Heroes (W6.4) are effectively the same as those used to generate a Japanese suicide hero. The "Japanese" die above is therefore no longer limited to use by Japanese units.

Jack’s other suggestion was for a set of two Starshell dice, one of which would serve as a Starshell Placement die. As it happened, I had begun work on a 19mm design a year earlier. I was under the mistaken impression that it was possible to produce a ball-cornered version of a “craps” die. The bigger die didn’t pan out. In 2015, we released a 16mm Starshell Usage die. It’s ideal when playing night scenarios of certain Campaign Games (CG).

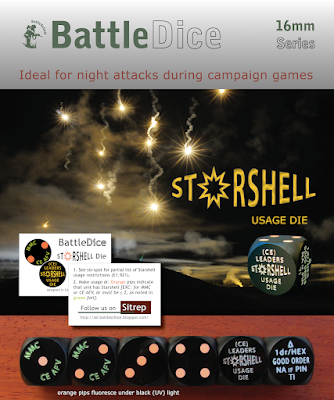
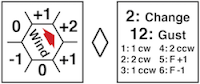
16mm Starshell Usage Die

Mark Watson expressed a familiar lament. Every time he rolls double-ones on a Wind-Change DR (B25.65) he has to make a “rules dive” in order to figure out what to do next, if in fact anything. “It’d be nice,” he added, “if the dice also reminded me to make it start raining when it was overcast.” Well, there’s no easy way to indicate when rain (or snow) would begin, let alone increase or stop, using dice. (Don’t get me started on Civilian Interrogation [E2.4], which occurs on a Wind Change DR of 3 or 4). I thought about these things. A lot. But I couldn’t see how it could be done. 

The direction and the strength of the wind is another matter. The former is complicated by the fact that a change in direction is ignored if there’s no wind. Wind Force isn’t straightforward either. A force decrease, for example, will actually result in a force increase if there’s currently no wind, while a force increase could result in a decrease in wind force if Heavy Wind is in effect, becoming Mild Breeze as a consequence. In other words, those of you still capable of reading the tiny text on the back for the wind-direction counter may still find yourself scratching your head after making a change dr. It’s certainly possible to design a die that takes most of this into account. However, the cost is prohibitive for a die that’s unlikely to see use during the course of most scenarios.

Finally, Steve Slunt asked that I consider an Infantry Smoke Placement die. Reflecting on it now, it’s a pretty neat idea. Considering that many newer or infrequent players don’t use SMOKE nearly enough, such a die might prompt some to smoke ‘em if you got ’em more often. A white die with green pips on the one-, two- and three-spots would work for regular squads that have a Smoke Exponent. Satchel charges on the four- and five-spots could signify availability for Assault Engineers packing extra SMOKE. Finally, the six-spot could feature reminders that there is +1 drm for White Phosphorus (WP) grenades, and more important, that rolling a six ends the squad’s Movement Phase (MPh).

What, if any, specialized BattleDice do you think would make a good player aid?
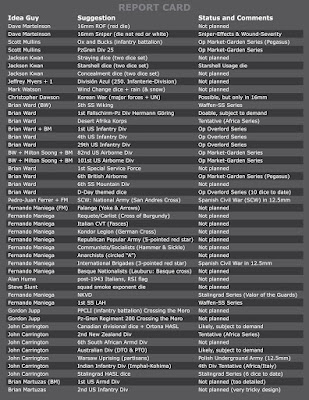
Report Card

The 2014 wish list was a long one. Of close to 50 suggestions, almost 30 had made the cut by 2017. If we discount seven of the nine requests related to the Spanish Civil War, roughly 70 percent of the asks resulted in new BattleDice. This figure includes a few dice that are related to a specific request but may be considered substitutes. For example, the British “Red Devils” die with a Pegasus on the ace works well for the British 6th Airborne Division. The same die works equally well for the glider-borne “Oxs and Bucks” who were part of the same division. The table below summarizes the requests for new BattleDice and what became of them.

BattleDice Report Card 2017

What now?

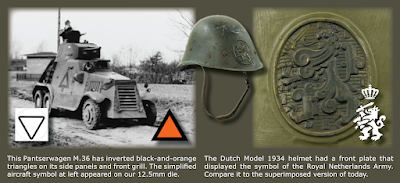
I’d really like to produce a 16mm Dutch pair for our Europa Series. To date I’ve failed to come up with a compelling design. What about that orange triangle thingy, you ask? It’s simple enough. No orange foil though. And no orange dice. Granted I did use a simplified version of this symbol on a 12.5mm die. Only that seems like a cop out for a larger format.   Think you have what it takes? Submit a design for a pair of 16mm Dutch BattleDice. If we use your design, we’ll gift you a pair, along with every other pair in the Europa Series.

Dutch Dilemma - For want of a compelling design.

There is no shortage of outstanding requests for new designs. Some, such as a Slovak pair for the Europa Series, offer the promise of interesting and colourful dice. Others like Canadian divisional dice are downright dull. The only pair in the Empire Series dazzles in comparison. There are those who would snap up any new Waffen-SS designs and those who would turn their noses up at another die of a military formation be it divisional, corps, or army. And yet much territory remains unexplored. 

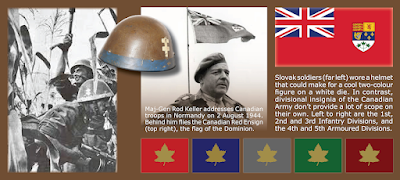
Strange bedfellows - Slovaks and Canucks

The Korean War is a case in point. A South Korean die would be stunning, a die for the Chinese People’s Volunteer Army (CPVA) not so much. Below are a few examples that I threw together over the course of a couple days. I’m not satisfied with any of them, except perhaps the last die. The “sturm und stoss”  die could see a lot of use when playing Campaign Games I, III, and IV of Red Barricades.

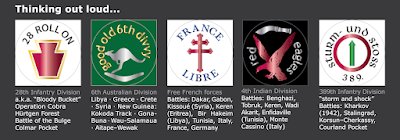
Anything jump out at you? ;-)

So what do you think? Are we done yet? Or are there certain subjects still in need of some love? Let me know in the comments below. 

Free stuff

If you comment as a Squad Leader—a Follower of Sitrep—you’ll be entered automatically in our New Year’s raffle. Up for grabs is a copy of Bounding Fire Productions’ Onslaught to Orsha 2 and a set of our ASL at 30 BattleDice. Feel free to submit your two cents after 31 December. However, only those who comment before 1 January 2022 will be eligible to win on New Year’s Day.

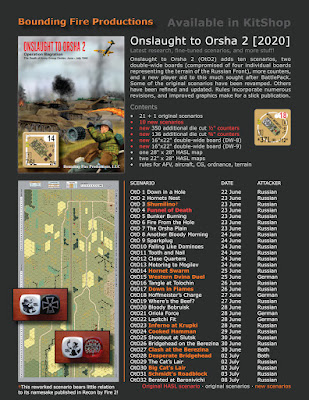
New Year's Prize: Onslaught to Orsha 2 - Enter today!

In other news, I’ve got two posts in the Bishop Pointers series raring to go. The second article is complete. However, it’s on hold pending completion of the first article, which is waiting on feedback from MMP regarding some interpretations of the rules.

Thanks for reading. Merry Christmas!

Notes

1. As per E1.53, a Lax unit/stack automatically Strays if the colored dr of the Movement DR is a 6, a Normal unit/stack Strays only if the white dr of the Movement DR is ≥ 3, and a Stealthy unit/stack Strays only if the white dr of the Movement DR is ≥ 5.


31 October 2021

BP-3 Infantry Target Type and CH

The Infantry Target Type and Critical Hits

By James Bishop and Chris Doary

When firing ordnance, newer players tend to count all of the Dice Roll Modifiers (DRM) and include them in the To Hit Number (TH#). For instance, a Gun fires at an Infantry unit in an adjacent stone building Location. Some players see a Basic TH# of 8 with a +3 DRM for the stone building Terrain Effects Modifier (TEM) and -2 DRM for Point Blank Range, and conclude that they need a 7 to hit. While this may get the Dice Roll (DR) you need to hit the target, this line of reasoning can rob you of a Critical Hit (CH). With this in mind, this article will examine how to calculate a CH when using the Infantry Target Type (ITT). Let’s get stuck in.1

Basic To Hit Number 

The first thing we need to do is distinguish between the Basic TH# and the Modified TH#. Granted it’s possible for these numbers to be the same value when, for example, no Gun or Ammo Modifiers apply, or the only modifier is 0. However, it’s the Modified TH# that is used to calculate a CH—more on this shortly.

Determining the Basic TH# is relatively straightforward. Once we select the Target Type, we move right along this row until we arrive at the range bracket that corresponds with the range from Gun to target. Each range bracket on the ITT has a black and a red number. Each is the Basic TH# for that range bracket. The number that applies depends on a number of things. For instance, if the date is 1942, American ordnance uses red TH#, as shown in the C3 To Hit Table example below.

C3 and C4 To Hit Tables

Modified To Hit Number

The Modified TH# is the sum of the Basic TH# and any applicable Gun or Ammo modifiers found in the C4 Table. As with the C3 Table, determining which modifiers apply is a matter of cross-referencing a Gun’s barrel length and calibre with the relevant range column. (Because we cannot use the ITT to fire SMOKE, we can ignore this row. Similarly, APDS and APCR can only be fired at vehicles on the Vehicle Target Type, which allows us to ignore this row too.) Let’s do the math using the example on the previous slide. Before we do, keep in mind that Gun and Ammo modifiers are not DRM. They modify the Basic TH#, not the DR.

You will recall that, in our example, it is 1942 and the M3A1 37mm Anti-Tank (AT) Gun therefore uses red TH#. The range to the target is 14 hexes. On the C3 Table we determine that the Gun’s Basic TH# is 5 on the ITT. At this range, the extra-long (LL) barrel increases the accuracy of the Gun, bumping its TH# up to 6. However, the Gun pays a heavy price at this range due to its small calibre. It suffers a -1 loss in accuracy for being under the 57mm threshold, and an additional -1 loss for being smaller than 40mm. You read that right. The Gun-calibre modifiers are cumulative. The net result of all applicable modifiers is a Modified TH# of 4.

Final To Hit Number

Before we can assess whether a Gun has achieved a CH, we need to determine the value of a second variable called the Final TH DR. We arrive at this value by adding all applicable DRM to the sum of the dice rolled—the Original TH DR in ASL-speak. 

Building on our 37mm AT Gun example, we find in the slide below that the target is a Vichy squad that has entered hex 86J6 using normal movement. Orchard TEM is +0. Nothing to write home about. But at least it’s not Open Ground. So the -1 DRM for First Fire Movement in Open Ground (FFMO) does not apply, although the -1 DRM for First Fire Non-Assault Movement (FFNAM) does. However our hapless Frenchmen have stumbled into the Gun’s Bore Sighted Location, which subjects them to an additional -2 DRM. The net DRM now stands at -3! 

A Modified TH# of 4 is beginning to look respectable at this point given that the Gun will hit on an Original DR of 7 or less. Even better when the American player rolls 4 (3,1)! Adding the negative TH DRM to the Original TH DR we arrive at a Final TH DR of 1. It’s definitely a hit. But given that Final TH DR less than 2, the holy grail of ASL DR, surely it must be a CH. Only it doesn’t work that way. 

North Africa 1942

Critical Hit

According to C3.7, a CH is a hit so well placed that it significantly increases the prospect of harming the target. Not surprisingly new and veteran players alike get excited whenever they roll double ones on a TH DR. Barring an Improbable Hit—we’ll get to that in due course—rolling “snake-eyes” on the Area or Vehicle Target Type automatically results in a CH. 

However, on the ITT an Original TH DR of 2 doesn’t guarantee a CH, although it frequently results in one. But we’re getting ahead of ourselves. Truth is, there’s more scope for landing a CH on the ITT than on the other Target Types. And this has to do with the unique way in which a CH is calculated when using the ITT. 

In order to achieve a CH on the ITT, the Final TH DR must be less than half of the Modified TH#. Returning to our example in North Africa, the American Gun has scored a CH because its Final TH DR of 1 is less than half of the Gun’s Modified TH# of 4, as shown below. Had the Vichy soldats been more careful and declared Assault Movement, the Final TH DR would have been 2. While still a hit, it would not be a CH, because 2 is not less than half of 4.

The Vichy squad is doomed!

The immediate takeaway is that, unlike Area and Vehicle Target Types, the Original TH DR is not the main determinant in assessing whether a CH has been achieved on the ITT. Rather it is the Final TH DR in relation to the Modified TH# that most often matters. This is borne out by the way that an Original TH DR of 2 is treated on the ITT. Only if the Final TH DR is less than the Modified TH# will an Original TH DR of 2 result in an immediate CH.

In the slide below, the American Gun has targeted a Japanese crew in 62P8. The 2-2-8 is in a palm tree Location that has been acquired by the Gun. With only a +1 hindrance for the palm trees in Q8, the net TH DRM is -1. The Original TH DR is 2, but it doesn’t guarantee a CH. However, because the Final TH DR of 1 is less than 2.5, or half of the Modified TH# of 5, the outcome is a CH. Note that C3.7 does not round fractions up or down. Half of the Modified TH# is just that, half.

Daily Double - Doubling down on Double Ones

Even in situations where the Final TH DR is not less than half of the Modified TH#, “double ones” may result in a CH. Provided the Final TH DR is sufficient to hit a target on the ITT, a subsequent die roll (dr) is made to determine if the hit is Critical. A subsequent dr of 1 results in a CH. But so will a subsequent dr that is less than or equal to half of the Modified TH#. Have a look at the 3-4-7 in P8 in the “Daily Double” slide. Due to the palm hindrances and jungle TEM, an Original TH DR of 2 results in a Final TH DR of 5. This is equivalent to the Modified TH#, and is therefore a hit. However, it’s possible for the hit to be critical on a subsequent dr. Given that the Modified TH# is 5, a subsequent dr of 2 or less will do the trick, as these dr would be less than or equal to 2.5. 

There’s one last way that an Original TH DR of 2 can result in a CH on the ITT. However, in this case, the Modified TH# doesn’t play a role. Due to the TH DRM and the Modified TH#, it is impossible for the Gun crew to roll low enough to hit the 4-4-8 in the “Daily Double” slide. Even “snake-eyes” will result in a Final TH DR greater than the Modified TH# shown. However, regardless of which Target Type is used, an Original TH DR of 2 nevertheless entitles the firer to an Improbable Hit (C3.6). In such cases, a firer obtains a hit with a subsequent dr of 1, 2 or 3, with 1 being a CH. Anything greater is deemed a miss.

In summary, there are three ways to achieve a CH on the ITT. The first way to score a CH involves having a Final TH DR that is less than half the Modified TH#. The second is an Original 2 TH DR that hits the target followed by a dr of 1, or a dr less than or equal to half the Modified TH#. The third is an Improbable Hit, an Original 2 TH DR that results in a Final TH DR that is greater than the Modified TH#, and therefore requires a subsequent dr of 1 for the hit to be critical. 

Let’s look at a few more examples that will help drive home the importance of the Modified TH# in determing a CH on the ITT.

Modifying your behaviour

Parting shots

This article has focussed on how to achieve a CH on the ITT, in part because of the unique way a CH is determined on the ITT, but primarily because so many players miscalculate and therefore miss out on a CH. As for how to resolve a CH, we recommend that you reacquaint yourself with C3.71. That said, we will leave you with a couple of pointers. First, if a target Location contains multiple eligible targets, Random Selection is used to determine which target suffers the CH (C3.74). And second, if a Gun and its manning crew are hit by a CH, they are eliminated regardless of the effects DR (C11.4).

Calling out the Modified To Hit Number in conjunction with the net To Hit Dice Roll Modifiers helps with calculating a Critical Hit correctly. Remember that the Final TH DR must be less than half of the Modified TH# to land a CH, and that any fractions that may result from this halving are retained as is; they are not rounded up or down. Finally it’s worth repeating that an Original 2 TH DR, in and of itself, isn’t enough to result in a CH on the Infantry Target Type. Furthermore, the lack of an automatic “snake-eyes” CH on the ITT is offset by the ability to land a “crit” without the need to roll an Original 2 TH DR. 

We hope that you found our explanations useful. If you have corrections to offer, please don’t hesitate to let us know. An earlier version of this article (by Jim Bishop) was published in the September 2021 issue of Banzai (Vol. 26, No. 1).

Notes 

1. Ed. To “get stuck in (or into)” is an informal British expression similar to the imperative “let’s go!” It means to start something at once with vigour or determination. As with earlier Bishop Pointers, I’ve edited and expanded upon the original. Any errors that may have crept in are mine.


09 September 2021

BP-2 Converting a Spotting Round

Converting a Spotting Round to Fire For Effect

By James Bishop

In August 2021, I attended the ASL Scandinavian Open tournament in Copenhagen. The French have Offboard Artillery (OBA) in WO33. Walking around the room, I twice observed players Convert a Spotting Round (SR) to Fire For Effect (FFE) incorrectly. “One-Eyed Jacques” is an ideal case study for this all too common error.1

How to do it right

I have excerpted a section of the C1 Offboard Artillery Player Aid—commonly called the OBA Flowchart—that I will be referring to throughout this article. In order to Convert a SR effectively, you need to understand what’s really going on at this stage of the OBA process. Once you grasp these subtleties, you’ll increase your prospects of placing a Fire Mission significantly. And you’ll be better equipped to frustrate your opponent’s attempts to use OBA against you. For ease I have labeled the two decision-making rectangles in our section of the chart “A” and “B.” I also included the errata from ASL Journal 11, which instructs us to change “AR” (Artillery Request) to “SR” in rectangle B.2


For our purposes we will assume that you have successfully navigated the flowchart to the point where you have maintained Radio Contact, announced your intention to Convert, rolled for accuracy, and corrected the SR (if necessary). You are now ready to Convert the SR to FFE. 

It’s not enough to simply announce your intention to Convert a SR, as some players presume. There are a couple of crucial conditions that must be met before a SR can be Converted to FFE. 


Rectangle A: Determining LOS

The process begins with rectangle A. One of two conditions must be met at this stage before we can continue the Conversion process:

  1. The first condition is the most straightforward. Provided the Observer has Line of Sight (LOS) to the Base Level of the SR hex, we proceed to rectangle B. The Base Level, according to the Index, is “normally the lowest level Location” excluding subterranean Locations.3 Normal LOS rules apply with respect to Blind hexes, LOS Obstacles, LOS Hindrances, and so forth.4 
  2. Failing that, the Observer must satisfy a two-part condition. Because the Blast Height (C1.32) of a SR is visible two levels above the Base Level of a hex, it’s possible for an Observer to see a SR in an otherwise Blind Hex. Should this be case, the Observer also must have LOS to a Known enemy unit,5 either in or adjacent to the SR hex. 

For this and other OBA actions, concealed units in non-Concealment Terrain are considered Known to the Observer. (Footnote “d” after the word “Known” in rectangle A reminds us of this fact.)6 

If the Observer fails all or part of either test, we follow the “No” path to the green stadium, (hereafter oval) to the right of rectangle A, which leaves the SR in place but “unconverted.” 

In sum, both conditions rely on an Observer having LOS to where the SR has landed. The second condition is complicated by the need to have LOS to a Known enemy unit too.

Rectangle B: Converting

Let’s assume that we’ve met the tougher, Blast-Height condition in rectangle A. Following the “Yes” path to rectangle B, we are asked if are there any enemy units in or adjacent to the SR hex, in what is otherwise known as the Blast Area of a HE Concentration. And if so, are all of them unknown to the Observer? Because our Observer had to have LOS to a Known enemy unit in the Blast Area in order to get to rectangle B in the first place, we can respond with an unequivocal no. The “No” path leads directly to the green oval below, allowing us to Convert the SR to FFE:1. 

We would take the same “No” path if our Observer had LOS to the Base Level of the SR hex (rectangle A) and there were no enemy units in the Blast Area (rectangle B).7 

But what happens if all of the enemy units in the seven-hex Blast Area are unknown to the Observer? We sidestep. The “Yes” path from rectangle B leads to a square that instructs us to make an extra chit draw. 

If we draw a black chit, we proceed along the “Black” path to the green oval and Convert. Should we draw red, we sidestep again. The “Red” path leads to a rather unfriendly red oval with three, dire consequences. Not only does the SR not Convert, but it’s lost altogether. Adding insult to misery, Battery Access is also lost. 

***************

Harassing Fire

Harassing Fire is a special case. While all rules pertaining to enemy units in or adjacent to the SR remain in play, any units located in the outermost hexes of a Harassing Fire Blast Area are ignored, regardless of whether they are Known to the Observer or not. Provided the Observer has LOS to the Base Level of the SR hex or to the Blast Height, and there are no unknown enemy units in or adjacent to the SR hex, the SR will Convert without the need to make an extra chit draw.


Examples

For this section please refer to the illustration below. The Observer is in 13aI5 on level 2. Five SR are on the board labeled SR:A through SR:E. I will discuss each in turn.

Clearly, there is more to attacking with, and defending against, OBA than offered in this brief article. If you would like to see more about this or some other topic, let me know what interests you and I may take it on. I hope you found this useful. Should you spot any errors, please let me know so that I can correct them. -- jim

Notes

1. As editor and de-facto “ghost writer,” I’ve again mutilated another of Jim’s gems. I assume full responsibility for any errors that remain or may have crept in due to my meddling. For the most part, I’ve expanded on Jim’s content, although some sections have been extensively rewritten. Hopefully, I’ve conveyed his central points in a coherent manner. Compare with his original post here.

2. You can find this errata near the top of the right-hand column of page 57 in ASL Journal 11 (2016), under the heading Charts & Tables.

3. According to the Index definition of Base Level, if the lowest level Location in building hex does not allow VBM along at least one hexside of that hex, the Base Level is that of the highest building level in that hex [EX: The Base Level of 20C7 is 2½; that of 20D7 is 0]).

4. Low Visibility conditions such as Fog (E3.31), Night Visibility Range, and artificial Illumination present special challenges for OBA Conversion that are well beyond the scope of this article.

5. Be careful not to confuse “Known” enemy unit in the context of OBA actions and “Known Enemy Unit.” The latter is defined by the Index as “any unconcealed, non-prisoner enemy unit—even one which is broken or in Melee—which the unit in question currently has a LOS to.” In contrast, an Observer will consider a concealed unit not in Concealment Terrain (e.g., in Open Ground) to be a “Known” enemy unit, as explained in the next endnote.

6. Footnote “d” on the last page of the C1 Offboard Artillery Player Aid states the following: A Known enemy unit is an unconcealed enemy that you have LOS to. However, Concealed units in non-Concealment Terrain [EXC: night, Winter Camouflage] and in LOS of the Observer are always considered Known to him for his OBA actions.

7. Hidden, subterranean, and aerial units are excluded.

Get your OBA tokens today!

03 September 2021

BP-1 Stop and Go Traffic: A Synopsis

By James Bishop

Recently players have posted questions online about Moving, Motion, Starting, and Stopping, and how these interact with C6 Target-Based To Hit DRM (Dice Roll Modifiers). These questions appear cyclically, and I can recall answering them for as long as I have played ASL. Much of the information in this article appeared in Ole Bøe’s “Stop and Go Traffic” article, which originally appeared in ASL Annual ‘96. These old Annuals are available as PDF files from MMP, or can be picked up used from all of the usual outlets. I highly recommend you read the original as it's still informative. But for those who can’t, I offer a summary of that article here.1

Moving and Vehicular Target

To apply DRM properly, it's important first to understand the difference between uppercase-Moving and “Moving Vehicular Target.” A Moving Vehicular Target, often referred to simply as a moving target, is defined in C.8. It includes any vehicle during ITS2 Movement Phase (MPh) that has a) entered a new hex, or b) Bypassed a new hexside within its current hex. In addition, any vehicle that a) starts ITS MPh in Motion, or b) is currently in Motion, qualifies as a Moving Vehicular Target. I’ll explain the concept of “Motion” shortly. The key here is that a Moving Vehicular Target is one that has either moved to a new position on the board, or qualifies for Motion status.


Moving is more nuanced. The ASL Rule Book (ASLRB) doesn’t draw a clear distinction between the two primary uses of the term in the game. In its narrowest sense, Moving refers to a unit that is currently conducting ITS MPh. I should stress that only one entity can be said to be Moving (or “phasing”) at a time. However, a Moving entity can consist of more than a single unit. Multiple units can Move as a stack, including Armored Assault (D9.31), which allows an Armored Fighting Vehicle (AFV) and Infantry to Move together. Less common is a “multi-hex stack,” which uses a form of Impulse-based movement.3 In all cases the constituent parts of any Moving group of units are considered Moving regardless of which unit (or units) are actually expending a Movement Factor (MF)/Movement Point (MP) at a given moment. For example, a stack declares Armored Assault. The AFV expends a MP to start, and another to change Vehicular Covered Arc (VCA). Although the Infantry accompanying the AFV has yet to expend any MF, both it and the AFV are Moving, that is, they are conducting THEIR MPh (as a stack). Interestingly, the vehicle does not yet qualify as a Moving Vehicular Target, although it does qualify as a target for Defensive First Fire, which brings me to the broader definition of moving, namely the expenditure of MF/MP.

Rule section A8.1 states that the “portion [of Defensive Fire] occurring during the enemy MPh is called Defensive First Fire and can be used only vs a moving unit(s).” In my previous example, the AFV expended 2 MP. The AFV is therefore moving for the purposes of Defensive First Fire and can be fired upon based on either or both MP expended. The Infantry, however, cannot be targeted directly because they have yet to expend a MF.4 A similar situation occurs when a Stopped vehicle attempts but fails to dispense Smoke at the beginning of ITS MPh. While the vehicle is Moving—in the narrowest sense of the term, it's not moving for the purposes of Defensive First Fire, because it hasn’t expended a MP (D13.2). However, were the vehicle to end ITS MPh at this point, it would qualify for Defensive First Fire, because it's considered to expend all of its remaining MP in that hex (D2.1). This is a case where a vehicle has Moved (conducted ITS MPh) without actually moving anywhere. Confusing, I know. If only such a key concept as “moving” was spelled out in the rules, or defined in the Index.

Stopped and Non-Stopped

The default setting for a vehicle that sets up onboard is Stopped (A2.52). According to the Index, a Non-Stopped vehicle is one that has not expended a Stop MP since its last Start MP expenditure during ITS MPh. A Non-Stopped vehicle is therefore a moving unit in both senses of the term “moving” discussed in the previous paragraph. On the one hand, a Non-Stopped vehicle is conducting ITS MPh. On the other hand, it's moving for the purposes of Defensive First Fire. However, a Non-Stopped vehicle is considered a Moving Vehicular Target only if it has entered a new hex, or used Vehicular Bypass Movement (VBM). So contrary to Stopped status, which can apply during any phase, Non-Stopped status can only apply to a vehicle during ITS MPh. For instance, it’s possible for a vehicle to become Stopped during an enemy Prep Fire Phase as a result of an Immobilization, Shock, or Stun result. But what happens if a vehicle chooses not to end ITS MPh Stopped? 

Motion Status

The term used to describe a vehicle that isn’t Stopped before or after ITS MPh is called Motion. A Moving vehicle—one conducting ITS MPh—is never in Motion. It's either Stopped or Non-Stopped. However, a vehicle which ends ITS MPh without expending a Stop MP assumes Motion status. This status in indicated by placing a Motion counter atop the vehicle. For To-Hit purposes, a Motion vehicle is always treated as a Moving Vehicular Target. Although the Motion counter is removed the moment a vehicle with Motion status begins ITS MPh, the vehicle remains a Moving Vehicular Target. This should be self evident given that the vehicle has yet to expend a Stop MP, and is therefore Non-Stopped, and thus a Moving Vehicular Target. In contrast, a vehicle not under a Motion counter will begin ITS MPh as a Stopped, non-Moving Vehicular Target. 

Summary

From the foregoing it should be clear that the game concepts of moving (A8.1), Moving (phasing), and Moving Vehicular Target are not synonymous. A vehicle can be Stopped, yet qualify as a Moving Vehicular Target. Conversely, a vehicle can be Non-Stopped but not qualify as a Moving Vehicular Target. Non-Stopped and Motion, while similar, are not synonymous either. The former represents a state during a unit’s MPh, that is, when a vehicle is Moving. Motion meanwhile is a kind of suspended state of movement that exists outside a unit’s MPh. When in Motion, a vehicle is paradoxically neither moving (A8.1)5 nor Moving (phasing), but is always deemed to be a Moving Vehicular Target, even to the extent of beginning ITS MPh as a Moving Vehicular Target.

A thorough grasp of the implications of each vehicle state and the distinction between moving and Moving, together with a careful perusal of the various charts, will greatly aid you in applying the correct DRM when the rubber meets the road.

Time to see how this all works in practice.


I hope you found this brief article useful. Knowing what DRM apply in a given situation is an important step toward mastery of combined-arms play. Please let me know if you spot any errors. Like you, I’m always learning. Now go read “Stop and Go Traffic!” It’s worth your time. -- jim


Notes

1. I (Chris) have taken great liberties editing this piece. Any errors that may have crept in are my own. Hopefully I have not deviated too far from Jim’s intent. You can find Jim's original text here.

2. The Advance Sequence of Play (ASOP) uses all-caps to underscore a) which unit (or group of units) is currently phasing, and b) at what stage a unit (or group of units) is in ITS MPh. A phasing unit conducts ITS MPh in three stages: START, DURING, and END. Although a unit is considered to be Moving, in the sense that it's the unit that is actively phasing, it may not actually be moving for the purposes of A8.1. With the exception of conducting a Search, any actions undertaken by a unit at the START or END of its MPh do not qualify as moving for the purposes of Defensive First Fire, despite the fact that the unit is Moving throughout ITS MPh.

3. In addition to Platoon Movement (D14.2), which allows two or three AFV to Move concurrently in Impulses, there are a number of other special cases where units may Move as a “multi-Location stack” or a “multi-hex stack,” such as Human Wave (A25.23), Cavalry Wave (A13.62), Banzai (G1.5), Convoy (D11.2), and Column (D11.52). Regardless of how many units participate in a Human Wave, for example, the Human Wave Moves as a single entity.

4. The Infantry, while Moving with the AFV, have yet to expend any MF, which means they do not satisfy the broader definition of moving. While the opposing side may declare a Defensive First Fire shot at the AFV, the Infantry may not be targeted (directly) because they are not moving for the purposes of A8.1. A question-and-answer confirms this:

A8.1 & D9.31

Q. An MMC [e.g., a squad] stacked with a stopped AFV declares an Armored Assault. The AFV starts. Does this spent MP allow enemy units to Defensive First Fire at the MMC?

A. No. 

5. Technically there is a fleeting moment at the END of ITS MPh (ASOP Step 3.41A) where a vehicle is moving for purposes of Defensive First Fire. Because a vehicle must either expend a Stop MP or place a Motion counter at the END of ITS MPh, the opposing player is entitled to Defensive First Fire before another unit begins ITS MPh.


14 February 2021

Armchair Generals - BoF16 Part 4


BoF16 Saluting a General

Series Replay: Andy Bagley (Russian) vs Jim Bishop (German) January 2021

Today’s post covers the final turns of this updated Friendly Fire offering. The first part of this after-action report (AAR) can be found here. After five turns of battle, both sides still have a lot of fight left in them. 

BoF16 GT6 End CCPh

German Turn 6

(Jim) Well, it has to happen this turn or it isn’t going to happen. I get a break and DI the Lee in 85I4 and the crew bails out on the MC. [Chris: This highlights the full nature of the threat posed by the ATR. Andy was okay with a Lee being Immobilized, but overlooked the fact that things can go sideways if its crew fails an Immobilization Task Check (TC). The crew of an Immobilized AFV also takes a TC each subsequent time its vehicle is hit. Conditions apply. (D5.5)] 

Again, the dice toy with me. I managed to get my PzIII past his Stuart in 85C5. I know his ATR is a threat but I don’t have a choice. I continue around to take the rear shot. Of course, not only does Andy hit, he hits in the Hull (rear aspect and 3 Armor) and then rolls another 3 on the TK shot. I think we can now officially say my goose is cooked but I will play it out to see how it finishes out. Adding insult to injury, I move another PzIII to take on that Stuart in 85C5, again manage the hit, and again manage to fail on the TK shot. I think we can safely say that fortune has not favored me to this point in the armor game. I close on the Stuart in 85J3 but fail to kill him in AFPh. Then I get two squads and a 9-1 into the Location and fail to kill him in CC. Needed a 7 and a 5 to immob, and got neither. 

(Andy) The Germans continued to move forward but at this point I decided to hold my ground; I’m likely to lose more tanks but it’s worth it to prevent his infantry getting to the woods. I missed the fact that a PzIII could enter my hex with the Stuart light tank; fortunately I could put it in Motion and his various shots missed. (Jim also discovered how hard it is to place a demo charge in front of a moving tank!) A key turning point occurred when my ATR, having made it all the way back from the frontline on board 5, got a rear shot on a moving PzIII which hit and destroyed it. Meanwhile, Jim is unlucky with the dice and keeps missing my Stuarts.

(Chris) Jim has a lot to do this turn. In fact, a lot has to go his way this turn if the Germans are going to be in position to clear the VC area on Turn 7. The game could well be over by the end of his MPh.

BoF16 GT6 PFPh

Success! The ATR Immobilizes the Lee in 85I4, prompting its crew to Abandon the tank. And then they’re off. The panzers, that is. The long-gun panzer in 42EE3 heads north to 85C3 from where it can bring four of six woods hexes in the VC area under fire. Next is the panzer in 42FF0 which also heads north. It dodges mortar bombs and 37mm fire to get behind the Stuart in 85C5, only to be destroyed by the Russian ATR in 85F8. 

BoF16 GT6 MPh

A lucky TH and TK to be sure. Andy rolled exactly what he needed to hit. And he rolled one less (1,2) than he needed to knock out the panzer. Jim could have avoided giving the ATR a rear aspect by driving through the Stuart’s hex in order to Bounding Fire from 85B5. 

BoF16 GT6 MPh

A second panzer rushes the Stuart, but fails to hit it or Stun its CE crew. The other surviving long-gun panzer charges the second Stuart, entering in 85J3 on its 13th MP. Andy passes a Motion attempt allowing the Stuart to start and pivot its turret to face K4, the likely approach rout of the DC-toting 4-6-8. [Being in Motion adds a +2 DRM to the DC, while Placement through the front Target Facing will add an extra +1 DRM.] A good move on Andy’s part. Still, if the DC attack succeeds, Jim’s panzer is in a strong position from which to take on the remaining Lee, not least because Jim cleverly risked Excessive Speed Breakdown (ESB) to stop after the Stuart went into motion. [There are worse places to Immobilize than HD in LOS of the last Lee.]

BoF16 GT6 MPh

German Infantry follows up, making good progress in the face of substantial DFF. [Two Russian attacks Cower, one of which “boxes.”] To my surprise, what I believe is a 4-4-7/LMG in 85I5 doesn’t take the six-down-one shot at the 4-6-8/DC when it enters 85K4. Maybe Andy was waiting for the outcome of the PAATC that the 4-6-8 was required to take before Placing the DC (A23.3). No PAATC was taken however, and the DC was placed without any apparent opposition. [Andy: We missed the fact that a PAATC was required, but Jim still needed a 5 or less with the DC to affect my Stuart.] 

The 9-1 stack moves adjacent to this Stuart and attempts to place Infantry Smoke in 85J2. It fails. But this doesn’t stop the last panzer from braving the gap covered by the Lee in 85G4. The Pz IIIG ends its move in 85K4 from where it can fire on the adjacent Stuart should the DC fail to destroy the Russian AFV. (A third fail-safe, or sorts, is the 9-1 stack, which could engage the Stuart in CC.)

BoF16 GT6 DFPh

The rearward Stuart savages the German 4-6-7 in 85F2 during Final Fire reducing it to a broken Second Line HS. [For good measure the Lee also busts up the German crew in 85H3 (which is later eliminated in the Rout Phase), before rotating its turret to acquire the panzer in 85J3. The Russian crew on board 42 will suffer a similar fate.] Meanwhile the squad in 85I5 drops concealment to fire without effect on the adjacent German HS. (This was arguably a mistake. Having passed up an opportunity to fire on the 4-6-8/DC in DFF, and an opportunity to fire on the HS in Final Fire, I would have preferred to see the Russian unit maintain concealment for Ambush purposes. [Andy: The ambush wouldn’t have guaranteed a win, and I figured I could get this squad back to the woods, so might as well fire.] Had the HS advanced in and the Russians gained Ambush, the German unit would have been eliminated on a DR of 8 or less, and the Russians would have retained concealment in +3 TEM! As it happened, the HS was subsequently eliminated in CC.

BoF16 GT6 MPh - CCPh

In the end, the DC proved to be a non-issue, as Jim fails to position the charge successfully (C7.346). His other fail safe, the panzer in 85K4, also misses its target. And so does Jim’s CC fallback. Overall, a disappointing turn for the Germans, although Advancing Fire does convert the enemy squad in 85G3 into a broken Conscript HS when it “boxes” its Morale Check (MC).

BoF16 RT6 End CCPH

Russian Turn 6

(Andy) In my turn, it’s simply a question getting all my remaining units infantry back into or near the woods. One squad dies trying to dash across the road to the north, but this allows the squad with the ATR to make it safely, and even my conscript HS gets close.

(Jim) In the Russian turn 6, my goose was officially removed from the oven and carved for serving. Andy kills my PzIII in 85D4. The 85J3 Stuart starts, l shoot at him, hit, and roll yet another failed TK DR. Andy then promptly B1F’s and kills me. Failure in the German Army is punished harshly. To add insult to injury, my PzIII in 85J3 fails to secure a hit. So I am in a very unenviable position with that AFV. It needs to move but has to survive the shot in the rear from the Stuart.

(Chris) The Russians have four Good Order units in the VC zone, two of which are concealed. Two more squads are within reach of the area, although they will have to brave fire from the 4-6-8/ATR in 85K5 to get there. Andy’s ability to “skulk” is limited. I think he needs to keep his Stuart in 85J3 in order to deny the 9-1 stack an opportunity to engage Russian Infantry in the tree line. This would also prevent the Pz IIIJ from firing on the last Lee, effectively keeping this key Russian asset in play on the final German turn. On the other side of the equation, German Defensive Fire must break as many Russian units as possible in the VC area, if the Germans are to have any chance of gaining Control of six hexes in one turn!

BoF16 RT6 PFPh

To the relief of the Pz IIIJ in 85J3, Prep Fire begins with an ignominious “wall hit” by the Lee’s MA. However, the Lee’s SA does hit and break the 4-6-7 with the Russian HMG in 85J2. (Not sure why this stack didn’t remain in 85J1 from where it could have placed a Firelane to 85D10.) Farther east the Pz IIIG in 85D4 falls prey to the adjacent Stuart, leaving the Germans with three tanks.

BoF16 RT6 PFPh

During the MPh, declaring a Dash doesn’t spare a 4-4-7 that crosses paths with snake eyes. However, this does place the 4-6-8/ATR under Final Fire, freeing the 4-4-7/ATR to cross the road. After the 4-4-7/LMG falls back to 85G6, the Stuart in 85J3 makes a run for it. 

BoF16 RT6 MPh

The Pz IIIG in 85K4 holds its fire until the Stuart turns in 85M4 to face the panzers.  Rotating its turret through 120 degrees, the 50mm gun barks the moment the Stuart stops. Needing a seven or less to hit, the round strikes the hull of the Stuart but fails to penetrate. The Stuart returns fire and scores a turret hit, and due to the range, penetrates the panzer’s armour. Being CE didn’t save the panzer, and being BU didn’t prevent the Stuart from finding its mark. Andy’s tankers have been bucking the odds all game long.

BoF16 RT6 MPh - DFPh

The powerful 9-1 stack is unable to have any meaningful impact on the Russian units in 85F4. Nor is the Pz IIIJ able to destroy the Stuart in 85M4. Similarly, the 4-4-7 in 85E5 gets off with a warning from the panzer in 85C3. Defensive Fire is a disaster for the Germans. The Russian hold on the VC area is stronger than it was at the beginning of the turn. German prospects for success are nigh impossible with at least one Russian Infantry unit per VC hex.

BoF16 GT7 PFPh

German Turn 7

(Jim) I am going through the motions here. I know this game is over but I have to see for myself. I got one HS back in the rally phase. Too bad I can’t rally any of my tanks. In Prep Fire Phase, I try to DI the last Lee and fail. I fire an 8 +1 and manage to PIN the crew. [MTR crew?] I then fire on the Stuart again intending to Intensive Fire against the Lee to open the door. I hit but as usual, I failed on the TK DR. I then IF at the Stuart, get the 1,1 and follow that with a 6,6. With that, I resign. I have a gauntlet of firepower I must push through and survive. If everything goes my way (as it has all game LOL), I still can’t get something into 85F5/85E6. That’s it. Turn the lights out.


(Andy) We played part of German turn 7, but it quickly became apparent that the Germans were not going to make it, so Jim resigned.


(Chris) In the RPh, the Russian crew in 85F5 has the cheek to rally. The Germans don’t have a single unit in a VC hex. German Prep Fire is therefore more a case of seeing how much punishment can be doled out on the last turn than a last-ditch attempt to win. The 4-6-8 with the ATR misses its DI shot against the last Lee, but receives a consolation prize in the form of a broken and Disrupted Conscript HS in 85F6. (In retrospect, one could make a case for stacking the 9-1 with the ATR squad from the get go. After all, the Lees are the biggest threat to German success.) The Pz IIIJ in 85J3 fairs better, dispatching the Stuart in 85M4. This success is followed up with an Intensive Fire shot at the Lee in 85G4. Jim had a roughly 27 percent probability of hitting. His gunner nailed it, and scored a CH. Alas the round was a Dud! 

BoF16 GT7 PFPh

Post-game comments

(Jim) Earlier, I promised I would have something to say about the missed LOS that led to my tank dying. I used to play a lot of chess and read about it all the time. Using eye-tracking software, it was noticed that Grand Masters tend to look at their opponents pieces 3 - 4 times more than they look at their own. When I made that move, I realized I got caught tunnel-visioning on my own pieces. I did it earlier with the 8-0 and two squads and missed the lesson then. So not only was I being dumb, I was being dumb twice. 

I also think that fortune was against me in this game. I don’t think it cost me the game, but as time went on, the lack of fortune just continued to stack the things I needed to do up until it simply wasn’t possible to get everything done. Andy rarely missed a TK shot. I rarely got a TK shot on my first attempt (even my 1,1 against his Lee in 42Y1 was a ROF shot). Every mistake I made (and I made plenty) got punished. When Andy made mistakes, punishment was hit or miss. Lastly, those !#@%!@#%$ Stuart’s are charmed devils. The number of shots I took at a Stuart and failed has to be close to ten. I don’t think Andy took ten shots all game and nearly all my tanks are dead. Such is war I guess. 

The scenario itself, in my opinion, favors the Russians pretty heavily if the Russians set up forward, pushing the Germans as far away as possible. There simply isn’t enough time to get to the VC area. If the Russian is competent in fighting withdrawal, the Germans are just that much worse off. If the Russians set some guys up in the Woods at-start and begin digging Entrenchments it gets just that much harder. As it is on the card, I think this is at least 60:40 pro-Russian. The Germans can’t afford to be slowed, they can’t afford to have luck balanced against them, they can’t afford to fail when they get a chance to kill a Russian tank. In my case, all of these were stacked against me and Andy played his part very well.

(Andy): After the game we both felt that against a competent Russian defence the Germans have a tough task here. I like to think my defence was competent here—not always the case for me! The Russian strategy of delaying German Infantry early on before falling back to the defence of the woods, combined with keeping tanks together around the same area seems to be the best one. Jim tried to counter this by surrounding the woods with his tanks, but would have needed to win the tank battle in order to do this, and unfortunately failed to do so. We wondered afterwards if armoured assault would help the German Infantry move quicker, but they can’t start this until Turn 3 and it would be difficult to coordinate. Still a very exciting game which we both enjoyed. [Jim: Anything that stops to Armored Assault is not getting forward to engage the Russians as they try to fall back. I think this option cuts against what the Germans need to get done here.]

(Chris) Kudos to Jim for playing this out to the bitter end. Andy’s play wasn’t particularly inspiring, but it was solid enough to frustrate the Germans at almost every turn. In spite of repeated setbacks, I think the Germans remained in the game long after many less experienced players would have thrown in the towel. Had the last Lee gone down to the IF shot, it’s possible that the Germans could have pulled this off. But absolutely everything would have had to have gone their way for the rest of the turn. Perhaps if the last Pz IIIG had been able to dispense Smoke in the Stuart’s hex, and break the ATR squad in 85E6, it may have set the stage for a final rush by remaining German Infantry. Even then, the Germans would need to survive Defensive Fire, and either break the remaining Russian Infantry with Advancing Fire or eliminate them in CC. Those were extremely long odds. In the end Soviet gunnery carried the day. 

Do I still think that the scenario requires an experienced player to pull this off as the Germans? Definitely. But not always. It’s possible that many of the Russian losses can be attributed to a Defender setting up too far back. 

The bottom photo is of a working Pz IIIJ in Oshawa, ON.

A skirmish line placed well forward is arguably the “school solution” for the Infantry portion of the defence. Maintaining a mutually supporting armoured block around the VC area is the second key takeaway. Should the Attacker either fail to destroy the AFV line, or fail to get Infantry to the VC area in time, the Russians have won. In the other words, there is more than one way that the Germans can lose the scenario, which puts the pressure squarely on the Attacker. The more experienced the Attacker, the more likely the Germans can secure the objective.

Are the technical challenges of handling German armour assets well the main reason the scenario appears to favour the Russians? Perhaps not. But I think it’s fair to say that the new card raises the question as to what the Germans are lacking. An extra Pz IIIG wasn’t enough to turn the tide in the Tuomo tussle. Nor was it enough when pitted against a less experienced defender. Perhaps, as Jim notes, an extra turn would do more to balance things out than providing the attacker with extra stuff would. I don’t know.


What I do know is that the original card favours the Russians 2-1 based on 37 recorded plays. If we include the results of this match and the one that prompted it, the MMP card currently favours the Russians 6-1! I’ll take those CC odds any day of the week. Seriously, what I believe these preliminary numbers really reflect is a broader point, namely that German players face a steep learning curve. Despite having more assets with which to overwhelm the Defender, early results suggest that it still takes time for the Attacker to master the scenario. I therefore anticipate a more even win-loss distribution over time. I doubt that it will ever reach parity. But having more to work with ought to nudge the German success rate much closer to 40 percent, or about eight points higher than the record for the original card. 


It’s a little harsh at this early stage to conclude that “Saluting a General” is a best-of dud. However, I do think it’s fair to characterize both versions of the scenario as decidedly unfriendly to the Attacker.

Designer Feedback

Gerry Proudfoot raised an important point on the GameSquad thread that led to this Series Replay when he suggested that “a pair of IIIGs be upgraded to more date-accurate IIIH.” That got me thinking. A dive into Chapter H revealed that the Pz IIIG was “discontinued” at the end of 1941. It was effectively replaced by the more common Pz IIIH, which first entered service in January 1941. This explains why there is no APCR exponent on the back of the Pz IIIG counter for 1942, and possibly why MMP added a Scenario Special Rule (SSR) granting this tank A5 in BoF16.

This had me wondering if the Pz IIIG were design-for-effect. Scenario designers often use an SSR to achieve a certain game affect. Were the “ahistorical” Pz IIIG included as a  balance mechanism? I could only speculate. So I asked Mattias Rönnblom about it.

It’s been more than twelve years since Mattias designed “Saluting a General.” However, he was unequivocal with regard to the composition of the panzer force. It was not designed for effect. The Pz IIIG were included because Mattias reasoned that they were part of the division’s order of battle at the time. In other words, the Pz IIIG were not included as way to artificially weaken the panzer force. Moreover, German sources didn’t distinguish between models in this way. Panzers were recorded by MA calibre and barrel length.

I would have expected that any surviving Pz IIIG would have been up-armoured in field workshops by September 1942, effectively making them Pz IIIH for game purposes. Mattias wasn’t convinced, and in any case saw no documentary evidence to support these upgrades. 

From what I was able to dig up, the division had 20 short-barrelled (kurz) 50s on strength in June 1942. The Pz IIIJ (lang) arrived in September. By November, 2. Panzer-Division reported having 8 kurz and 12 lang 50s on strength.

Mattias told me that there is nothing in the division’s history that would indicate that any Pz IIIG on strength were withdrawn from service. Moreover, he finds it very unlikely that any would have been withdrawn. On reflection, I tend to agree. The majority of the division’s panzers were light tanks: 11 Pz II and 33 Pz 38t! (The division also had 5 short-barrelled Pz IV in June 1942.) Of course, it’s plausible that all 20 of the Pz III on strength in June 1942 were Pz IIIH/IIIJ kurz. Chapter H treats the latter as Pz IIIH too. But given the antiquated state of the division’s panzer arm in general, probably not.

Mattias reflected that the original FrF56 card was unbalanced. And although he had some input with BoF16 version, he couldn’t recall specifics other than to say that MMP changed the panzer force mix. Indeed they did, which brings me to my final point about the MMP card.

When MMP swapped the Stuart III (M3A1) for the earlier model, the Russian light tanks became harder to hit. (Given how small these light tanks were, it’s hard to understand why both don’t qualify as small targets.) I get it. The core counter mix contains no M3 light tanks in Russian livery. But was MMP aware of the consequence of the swap?

Okay, it's a relatively smaller relative. But really?
It was only when I revisited the FrF56 card that I noticed the difference. Granted it’s not as big a swing as a fourth Stuart I—the Russian balance provision on the original card—it’s not nothing. The nature of the scenario necessitates a lot of BFF on the part of the panzers, because they must move to engage enemy armour. Any panzers that do survive DFF will invariably have a tougher time hitting a Stuart, whether in the MPh or the AFPh. This also calls into question the net impact of an extra Pz IIIG and APCR on scenario balance. Given that the original card favours the Russians almost 70 percent of the time, were the additions to the German OB in BoF16 enough?

What's your take on this?

To CE or not CE

That is was a discussion we had during editing, specifically about the merits of the Russian tanks being CE. Andy pushed back, as noted above and below.


(Andy) We may have to agree to disagree on the question of my tanks being CE. Jim of course drove one of his CE tanks through an 8 +2 shot (and others through 4 +2 resid if I recall correctly) with no problem. On the other hand it was an 8 +2 shot that broke my squad with the HMG.


(Jim) It’s all about risk vs reward. Your calculation is different. That doesn’t make it wrong and it clearly worked for you. It’s the differences in these value judgements that make for good games.


(Chris) My feeling re CE status is that it should be used whenever possible. Only when the risk is high would I BU. IMO, the risk for the Russians was minimal because the German Sniper was not a threat during most of the game. (Had Jim moved his Sniper near the Lees, BU would make eminent sense.) The German tanks have to come to the Russian tanks. When they do, the Russians will have first shot more often than not. And one less + DRM matters in the TH contest. The main exception to this general principle would be a threat from German Infantry, especially a stack directed by a -1 leader. For much of the game, German FP didn’t threaten Russian AFV crews. A second possible exception, is an isolated Russian AFV threatened with being swarmed by German tanks. In that case, it depends on what the goal of the Russian AFV was. If it was to tie down and damage/destroy enemy tanks, then why not stay CE in order to land a shot, and maybe an IF shot too. Frankly, the Germans are okay with trading a Pz IIIG for a Russian tank. So it’s not a tactic I would advise the Russians to adopt. But as Jim says, being BU worked for the Russians.


What do you think? Please leave a comment below.


Addendum 

For those interested in such things, the Pz IIIJ pictured in the “Then and now” slide is a working, reproduction vehicle that can be viewed (and occasionally ridden) at The Ontario Regiment Royal Canadian Armoured Corps Museum in Oshawa, Ontario (a 26-minute train ride from downtown Toronto). The museum also has an M3 Stuart. Be sure to check out the Aquino Tank Weekend if you plan to be in the area this September!